Outfitting the Vests
Some Vest Set-Up Options by Component 3/6/16
Overview
When we forget something for a hunt it’s often something we took off the vest and never put back. Like having a dedicated hunting vehicle, consider leaving a lot of things in or attached to the vest so in the confusion of leaving home they aren’t forgotten or misplaced. If you need another whistle or camera, don’t remove it from the vest…just get another one.
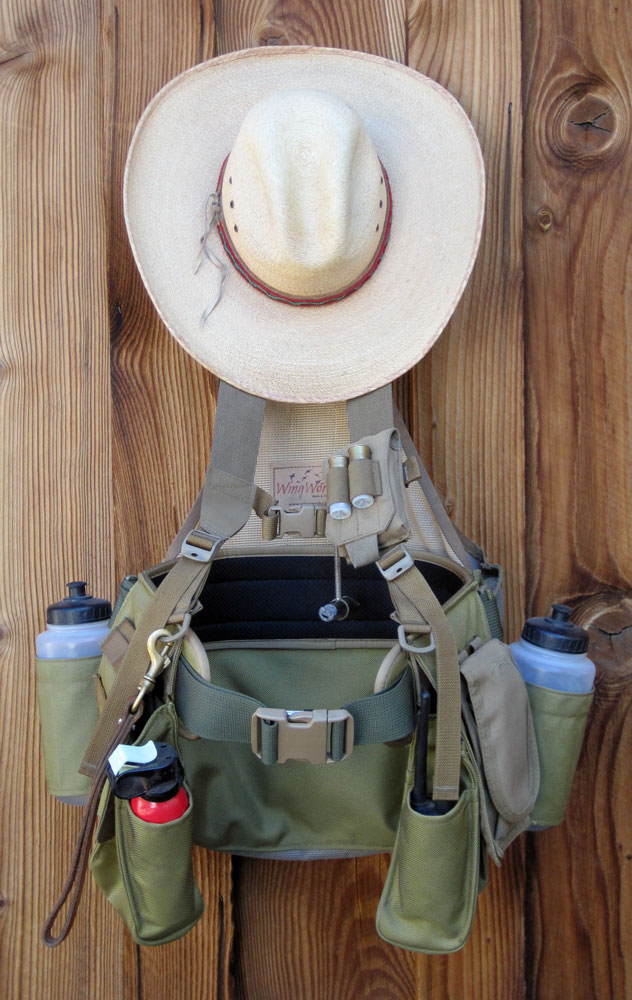
Shellpockets
Keep in mind that the long shellpocket flaps are designed to be tucked and Velcro’d into the pockets for no-look shell grabs. Some will want both pockets for shells, but we recommend going with your strong side pocket for shells and leaving the other for quick access items that may change from hunt to hunt. If you’re training or short on water storage, the 54 oz bottles we sell will fit easily in the long shellpockets where they’re easy to access, and balance out shell weight on the other side.
New Molle bases on each flap offer lots of pouch/holster options, but if one pocket is left open for shells it means just one front Molle pouch in use at a time. So far the iPhone6+ and lightweight pistol holsters have been the most popular for regular use. There are a lot of others out there, but check the width of straps on pouches to make sure they’re compatible with these Molle bases. Some of the cheaper Molle pouches are not very consistent on Molle layout and snap placement, so consider sorting through them to find a good fit. Depending on the pouch strap lengths, we have 2 top strap level options to make sure the fit is snug at the top of the pouch.
For handheld electronics we replaced the old flat slash pockets on the shellpocket front sides with a larger single pouch. Garmin Alphas/Astros and most other larger handhelds will fit safely, meaning the pocket is deep like the shellpockets to prevent accidental loss. A great location if you don’t have to use them constantly. If you do, think about the leather Garmin holsters on our site that clip into the front D ring at the front harness bases. “Lift and drop” is easier than “in and out” of a pouch, and risk of loss is very low. Other items that fit include certain sizes of bear repellent, 1.5 oz Ballistol Spray Lubricant or other, semi-auto pistol clips, wire cutters for snares, larger multi-tools, snacks, chukar calls, rolls of vet wrap, cameras and walkie talkies. A long slash pocket remains on the back side of each pocket for longer narrow items like hemostats, forks, bird neckers, knives and multi tools.
Regarding Molle mount pistol holsters, most hunters opt for a crossdraw mount on their offside pocket flap, leaving their strong side for shotgun shells. We offer a lighter and heavier version with similar footprints, but very different in appearance. The heavier version has a lot of adjustment for size and a stiffer base panel, and fits semi-autos best. It’s only available in RH, while the lightweight holster is ambidextrous and more useful for holding other things like pliers or game shears.
If you need a lanyard on anything going in or out of the pouches and pockets, the D ring at the base of each harness base is a good place to tie it. We also use 1/8″ coyote bungee through small grommets installed closer to or even inside a pouch to keep things hidden. Another option is to open up a seam and resew with the small bungee lanyard in the seam.
We haven’t built in any shell loops, preferring to pull out of sort of a “speed bag” pocket. There is a 2 shell 12 ga belt mount holder we sell on the site. Some use one on each side of a side release buckle, but we use just one for steel or varmint loads. There are always options for customizing this sort of thing as we’ve done for a couple of smaller gauge shells on our Tech Sheath shoulder mount camera or phone case. A Velcro mount shell strip could be added on almost any sew-able surface or exposed belt. If you do want to customize, consider getting a used industrial sewing machine. Once you figure it out it’s like having a table saw in the garage.
Shoulder Harness
Part of wearing a “waist loading vest” properly is getting the belt at the right level, usually centered over the belly button. The other thing to get right is the back and front straps on the shoulder harness. The back yoke should be high enough towards the neck that the straps come over the shoulders comfortably and in parallel. The harness should only hold around 25% of the vest weight, and help hold the belt in the hip load position. The new harnesses are somewhat padded with a larger surface area to spread the load. Mesh has replaced the old nylon yoke, and it’s lined with a more breathable material. There’s also a right/left element as we left just one adjustment strap end going away from the shooting shoulder.
The offside shoulder is still open for a vertical mount, removable pouch. We sell 3 on the site, mainly suited for phones, cameras, walkie talkies or Garmin GPS units. The $10 CLC holster has to thread on the strap above the sternum strap, but will fit the Garmins or walkie talkies, best if the flap is folded inside or cut and sewn down. The Tech sheath will fit most point and shoot smaller cameras and smaller phones, while the slightly larger iPhone6 holster will fit bigger phones, but not with jumbo protective armor. For big phones use the Molle iPhone6+ holster on the shellpocket flaps, or in another pocket somewhere. The holsters can be customized to hold whistles and a couple of shells on the flaps, or many other things. It’s a great location for fast access.
If you need a simple solution to hanging something light, try it hooked on the sternum strap.
We sometimes sew D rings to the Hypalon patch to hang whatever, or sew 2″ Velcro to the shoulder area to stick a small dog collar handheld or walkie talkie with adhesive based mating Velcro on the back. Most of these have a lanyard backup around the neck or to a D ring. We’ve experimented with a manufacturer of military slings, Button Sling, and hung shotguns off one point to a side release buckle on the harness. They work pretty well for 20 ga and under semi-autos and allow the gun to be hung barrel down in front, or over the shoulder barrel down to keep hands free when hiking the steeps. Not really part of the program yet.
Gamebag
This vest is not a pack with frame or stays, so keeping the most dense load close to the body is even more important.
Can’t do much about birds, they go into the gamebag, which these days is built from HD mesh fabric that helps them cool down more quickly. If you’re really concerned with cooling things down to maintain meat quality, consider gutting birds and pushing green grass into the cavity, or better yet swing by the truck and drop them in a cooler.
Loose water containers are heavy and tend to bounce around loose in a gamebag. There is a mesh pouch built in up against the waist belt, roughly 9″ x 9″, that will secure water bottles and small hydration reservoirs, or even extra bags of shells very efficiently. Our 54 oz bottle is oblong in shape and soft enough to create a really comfortable lumbar bump into the waist belt, whether empty or full. In this location we use the big bottle as a reservoir to fill the 32 oz side bottles when they get low. If using a reservoir, we’ve found it best to run the drinking tube forward under the off-shooting shoulder and up to fasten on the sternum strap.
Side zipper pouches are great for licenses and other paperwork, also choke tubes and wrenches.
The rear zipper pouch is a long way from your back, so consider storing lighter loads like clothing and medical supplies, lunch, etc. We like the basic emergency items like a “space sleeping bag”, 1 1/2″ Gorilla tape, gauze pads, blood clotting pads, muzzles, parachute cord and vet wrap. A few drugs like Benedryl, buffered aspirin, a baggie of Glycocharge, Rimadyl or equivalent , a few antibiotics and Aleve. We think more about stabilizing the injured dog and getting them out for professional care than doing a field hospital.
Gallery/Outfitting the Vest
Hunting in Open Country
We always recommend the long shellpockets whenever their wider profiles don’t get in the way of easily moving through cover. They’re larger capacity and have more storage options to make the hunt more comfortable and easier. No look shell grabbing is hard to beat when into big coveys.
Hunting in the Thick Stuff
The vests can be pared down in size and profile to help hunters pass through thickets and aspen saplings hunting grouse and woodcock. We created the grouse pockets to lay flatter on the body and ride more in front. Their wider and shorter shape keeps them high enough to miss the thighs when walking, and the fold-over flaps will lock out debris that tends to collect anywhere it can. They use snaps instead of Velcro, and make shell access a little slower than the open long pockets. A belt mount shell holder can help for a couple of quick loads. If you want to stick with long pockets and slim down some, consider a hydration reservoir like the Hydrapak 1.5 and 2L models on the site and pull off the 32 oz water holsters. You’ll instantly be 6″ narrower at the hips and be surprised at how small the vest feels.
Switching From Long Pocket to Grouse Pockets
Each belt/shellpocket set should have it’s own set of 1″ harness base straps bolted in, otherwise this gets to be a lot more work. No tools required if both belts have base harness straps installed.
- Disengage 1″ front harness straps
- Disengage 2″ side connection straps tying gamebag through water holsters to shellpockets
- Remove 2″ buckle from main waist belt
- Disengage 2″ waist belt straps from water holster loops back to the gamebag on each side
- Separate 2″ Velcro between gamebag and back of foam belt
- Lay new belt/ shellpocket combo inside down on table and center gamebag between pockets on to mating 2″ Velcro
- Reverse procedure until vest regains full function